Overview
In this knowledge base, we will delve into the world of ACLs and we will look at the ACL’s concepts as well as configuring standard ACLs. A typical approach to network perimeter security is to allow outbound traffic not explicitly denied and to deny inbound traffic unless it is explicitly allowed.
Why Needed?
- A closed network allows no connection to a public network; although security is still an issue due to a majority of attacks coming from inside networks today
- Open networks – these are very common and feature multiple connections to public networks – now two major threats – inside and outside
ABOUT ACL
Before we start with the various access lists, let’s talk about what the Access Lists actual are and why they are used. Access control lists (ACLs) provide a means to filter packets by allowing a user to permit or deny IP packets from crossing specified interfaces.
So with the use of Access-Lists you can permit or deny the IP packets on the base of IPs, Names, protocols and so on and the routing table decide the traffic routing on the basis of the set of rules we authorized.
There are 2 popular types of ACL: Standard and Extended.
| Access list type | Range |
| Standard | 1-99, 1300-1999 |
| Extended | 100-199, 2000-2699 |

Standard IP Access List
Standard IP lists (1-99) only check source addresses of all IP packets.
Configuration Syntax
access-list access-list-number {permit | deny} source {source-mask}Application ACL to an interface
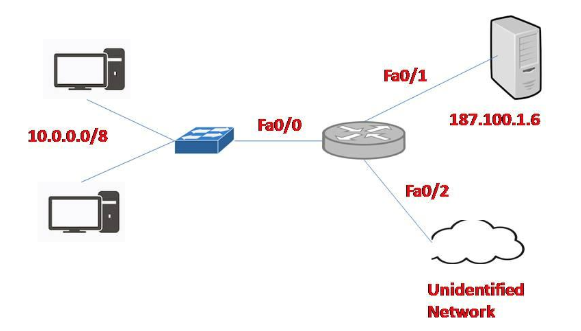
ip access-group access-list-number {in | out}The example of Standard IP Access List as shown in the above diagram.
Configuration:
In this example, we will define a standard access list that will only allow network 10.0.0.0/8 to access the server (located on the Fa0/1 interface)
Source that is allowed to pass:
Router(config)#access-list 1 permit 10.0.0.0 0.255.255.255(There is always an implicit deny all other traffic at the end of each ACL so we don’t need to define forbidden traffic)
Application of this ACL to an interface:
Router(config)#interface Fa0/1Router(config-if)#ip access-group 1 outThe ACL 1 is applied to permit only packets from 10.0.0.0 /8 to go out of the
Extended IP Access List
Extended IP lists (100-199) check both source and destination addresses, specific UDP/TCP/IP protocols, and destination ports.
Configuration Syntax
access-list access-list-number {permit | deny} protocol source {source-mask} destination {destination-mask} [eq destination-port]The example of the Extended IP Access List is shown in the above diagram. In this example, we will create an extended ACL that will deny FTP traffic from network 10.0.0.0 /8 but allow other traffic to go through.
Note: FTP uses TCP on port 20 & 21.
Protocol, Source, Destination and Port are denied are given below:
Router(config)#access-list 101 deny tcp 10.0.0.0 0.255.255.255 187.100.1.6 0.0.0.0 eq 21Router(config)#access-list 101 deny tcp 10.0.0.0 0.255.255.255 187.100.1.6 0.0.0.0 eq 20Router(config)#access-list 101 permit ip any anyApplication of this ACL to an interface:
Router(config)#interface Fa0/1Router(config-if)#ip access-group 101 outNotice that we have to explicitly allow other traffic (access-list 101 permit IP
CONCLUSION
The access list can be placed on the basis of a type such as the Standard access list and extended access list.
The standard IP access list should be placed close to the destination. Extended IP access lists should be placed close to the source. You can have one access-list per protocol, per direction and per interface. However, you can have one inbound and one outbound access list applied on Fa0/0. + Block TCP packets on port 30 from any source to any destination:
Router(config)#access-list 101 deny TCP any eq 30+ Permit any IP packets in network 192.23.130.128 with subnet mask 255.255.255.248 to any network:
Router(config)#access-list 101 permit ip 192.23.130.128 0.0.0.7 anyApply the access control list to an interface:
Router(config)#interface fastEthernet0/0Router(config-if)#ip access-group 101 in


Leave a Reply